Showing posts with label Eyeshadow. Show all posts

Tuesday, 25 February 2014

Review: L'Oreal Studio Secrets Professional Eye Shadow Quad

Today we are looking at the L'Oreal  Studio Secrets Professional Eye Shadow Quad in Desert Sunrise which i picked up last week for all of $5 at a Terry White Chemist which seems to be trying to get ride of a bunch of makeup which were a part of Christmas deals. I spotted this one and was quite taken by shade 1, it was a lovely shimmery peach with slight taupe undertones.

106 Desert Sunrise


It's a very nice neutral pallet (especially for the price) the colors are; 
1 - A shimmery pink/peach with a slightly taupe or purple undertone. Very soft and blends incredibly well
2 - A satin like shade that's more creamy then white but is actually quite pale
3 - A pale brown matte that's very similar to MAC Wedge, a great blending/transition color
4 - A dark brown matte that's great as an eyeliner or eyebrow color. it also works very well with a damp brush if you want to up the intensity.

Without Primer

All the colors are quite pigmented and not very chalky, this is a great everyday pallet which I have used everyday since purchase, my favorite look with this is:


Do you have a favorite low end neutrals quad you love?


Tuesday, 5 November 2013

Review: BH Cosmetics Galaxy Palette

Sorry for the absence, just not really been feeling very bloggy the past month after doing a post every other day in September, although I did get a few interesting things that I will show off over time the heat in Perth and trying to restrain myself when it comes to buying new stuffs there isn't as much for me to talk about right now.

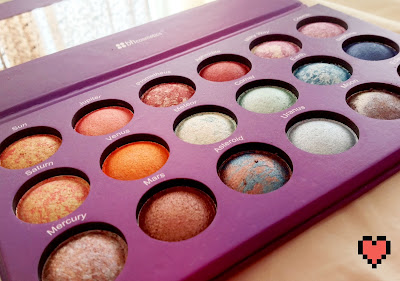
I got this at the start of October and I really love it, the design on the outside is kinda silly and very...teen but since the eyeshadow are so amazing I am willing to overlook that.


The palette was $14.00 plus shopping when I picked it up though it may have gone up since then since it was a promotional offer but nothing on BH seemed very expensive to begin with.

The Galaxy  palette is a set of 18 baked eyeshadow that can be used dry or with a bit of water for a more intense and long lasting experience. Because they are baked eyeshadows they all look like tiny planets themselves and this works really well into the theme of the  palette, but it does mean that every one will be a bit different. For instance Asteroid in mine is much more blue then red but the website photo was much more red with very little blue. 


Mars, Venus, Jupiter, Mercury, Saturn, Sun
Uranus, Comet, Aphrodite, Asteroid, Meteor, Prometheus

Eclipse, Neptune, Cosmic, Moon, Earth, Milky Way
The photos are all dry and without primer so you can only imagine what they must be like with either of those, they are wonderfully pigmented and soft and easy to blend. They are brights and very shimmery but if your looking to try something a bit outside your comfort zone this is a great way to go as they can be used together to make wonderful bright intense looks or simply as highlight colors on more neutral toned makeup.

Catch ya next time

Saturday, 21 September 2013

Review: Possibly Fake MAC Eyeshadows: Carbon, Sable, Shroom & Passion


If you saw my last post then you saw that i picked these up at Uni from a  supposed "auction seizure" and while thinking it was probably all a load of bull decided to try some stuff anyway as despite all that it seemed like pretty high quality stuff. i picked up Shroom and Sable as i had heard a lot about them before and was interested to see how they performed. Carbon was somewhat of a test purchase as i had seen numerous reviews saying that it was in fact a pretty terrible black eyeshadow and i thought this would help me judge the honesty of these shadows. Lastly passion was a cute pink and i wanted a more exciting color to try as well.


Packaging seems pretty legit to me from what i can tell with my very limited experience.


The color pay off on the first three is amazing and like it should Carbon is a bit fail, so either these are very good dupes, after i depotted my own mac shadows (ones bought at MAC counters that is) i was able to see that the authentic MAC pans are more rounded then these were. However quality speaks for itself and Fake Sable, Shroom and Passion all have good pigmentation and blend very easily and do not irritate my eyes, They do seem a bit softer though then the real MAC shadows i have (amberlights, star violet and wedge)


I'm happy with these and will continue to use them, but probably won't be going to get more when the seller reapears. The whole thing was an interesting experience and i will know in the future what sort fo things to look out for when it comes to fake products. However, just because their fake doesn't mean their bad.

Thursday, 19 September 2013

DIY Z Pallete


I recently got some MAC refill eyeshadow pans and then realized i had nowhere to store them, so i looked online and found some really awesome eyeshadow z pallets, all of which, with shipping were pretty expensive and also meant that for weeks my eye shadows would have no home. So i did the next best thing and made my own, i looked over sevral online tutorials and there are many to choose from. Here is my take on it:

What You Need:

- Unwanted Hardcover Book - size should be the same size you want your palette to be, choose one where the spine is not to big.
- Ruler (metal works best)
- Double sided tape
- Foam board (same size as your book)
- Scalpel (Scissors will work ok, but will be less precise and the lines less clean)
- Magnetic Sheet ( i got mine at an Art Shop for $4.95, but if you have a magnetic calendar lying around that will work too)
- Decorative Tape (optional)


1. Open your book flat and cut out the center portion (the pages) so that you have only the shell of the book left.


2. The center part might have some threads or glue so be careful while cutting, i found a scalpel worked best.

3. This is how your book should look when it's been gutted. I used this time to stick down the ragged edges with some decorative tape to make it look a bit cleaner.

4. Measure one side of your book against the foam and cut to size if necessary.


Be careful while cutting, foam can be quite brittle and if your knife isn't sharp enough it will catch. If you can use a new blade as it will make it much easier and neater. ( i learned this the hard way)


6. Your foam board and half book should be the same size now, be sure to check the fit before moving forwards to the next step.


7. Measure out an inside square (or rectangle as the case may be). I made mine 2cm in on each side, it;s possible to free hand this but measuring will make the end effect look better.


8. Cut out the central square (or rectangle). Be careful not to cut to the edges, this piece will make the base frame of the palette. 


9. Measure your magnetic sheet to size, mine was a self adhesive one so i was able to draw on the back paper before gluing it down.


10. Double check the sizing and make sure both the frame and magnetic strip fit, cut anything down that needs it.


11. I wasn't happy with some of the ragged edges in my frame so i covered it in the same decorative tape i used earlier to stick down the ragged insides of the book.


12. Stick everything down, my magnetic strip was self adhesive and for the frame i used double sided tape, hot glue can also work but a regular glue stick won't grip hard enough and might move around.


13. Decorate to your hearts content.


Fit your depotted eye shadows however fits best, aluminum pots like those used by MAC and Australis will need to have a piece of magnet stuck to the bottom to stick while others will simply stick on their own. The only thing i need to add is some velcro straps or ribbon over the side to keep it closed.


Here is another quick palette i made from a cd case, all i did was take out the plastic piece that the CD sits on and then decorated it all pretty like with my decorative sticky tape and then stuck the other magnet sheet i had in the bottom. 


Tuesday, 17 September 2013

Depotting Eyeshadow: The Journey


So i depoted some of my eye shadows.  As you can see it turned out pretty well and they are all nice and ready to go into my newly made Eyeshadow palette, but since i only had 4 eye shadows to go into it i figured it was a great time to depot some of the rest of my stuff. Since there are a a million and one tutorials out there about how to do this I'm just going to give a brief overview and list of the areas that caused me the most trouble and what to expect while doing this. It can be a bit hard so if your unsure or you love a certain eyeshadow too much then it's better to be safe then sorry.


1. I used a candle to heat my eyeshadow pans, i tried a hair straighter but it took too long and was for me personally too hard to judge when it was ready. With eyeshadow that had packaging similar to Essence the best tell was when i saw a ripple go through the sticker on the bottom and a part of it would fold or bend so i knew it was ready to go. I only sustained one small burn on my finger while doing this, becareful the pans are metal and get quite hot.

2. If you timed it right then the sticker should peel off like a breeze, and hopefully doesn't have any burn marks on it. Some eyeshadow pans have a hole on the back of them where you can push them to dislodge them from the case but despite what some tutorials showed me the Essence packaging has a hole on the back but it doesn't go all the way through to the pan so poking it will do you no good. 


3. Invariably what you will need to do is stick a blade (scalpel) or specialized tool in between the pan and case and wedge it out. In many cases the heat will have loosened the glue enough that at least one side will have a wider spae where you can jam the blade and wedge the pan upwards.

!!! If you start to see the powder begin to crack STOP. Go back and heat it up a bit more.


4. You might need to use our fingers to wedge the pan all the way up as remember there is still hot glue trying to pull it back down. While it's still warm get rid of as much of the glue as possible, it will save you a lot of stress, mess and nail breakage later on.


5. The best way i found to get rid of hot glue one it's dried is some rubbing alcohol and cotton eyar buds swirled in a circular direction followed by a plastic spatula to move it off. If that fails your nails will work but they will get dirty and cracked, as i found out.


I had the most trouble with this  MUA eyeshadow single as instead of loosening the glue underneath all that seemed to happen was the pan would become softer so when i would wedge the blade between the pan and case the pan would bend causing the powder to crack. This one was a complete loss, but if this happens keep the pan - you can either try fix it or make your own pressed eyeshadow out of pigments.

* This shadow of eyeshadow seems to be more crumbly then other colors, not sure why but the Essence eye shadow i had that was almost the exact same color also shattered when i did this, though not quite as dramatically.


The hot glue was quite thick, but so was the bottom of the case which was part of the problem with the MUA. Be careful if your trying to depot these. Do not rush and take your time.


The left over mess, lots of plastic to recycle, and far less plastic clogging up my makeup draws. This is not going to be for everyone, the reason i did it was mainly because i found i had eyeshadows in palettes that i never used because they were packed away. 

Here are some quick notes about which eyeshadow brands proved particularly difficult to depot:

MAC - Easy
Essence - Easy
MUA - Very Hard
Dior - Super Easy
Savvy - Impossible
Gosh - Moderate
Australis - Moderate
Revlon - Super Easy

Wednesday, 15 May 2013

Review MAC Star Violet Eyeshadow!!!


I finally got it! I'm so thrilled to finally add this to my collection as i can now actually show off what a gorgeous shade it is. After i posted up my wish list my boyfriend surprised me with this the next day because he's awesome like that.

MAC Star Violet is a warm pinky-purple with a hint of brown, it has a slightly frosty finish and despite the violet color is still subtle enough to use as an everyday color. I personally like pairing it with a gold or a bronze on my lid and then star violet in the crease. Because it's a warm toned shade it blends really well with other warm shades and neutrals like browns and taupes.


It's fairly pigmented, not crazy so, but nothing terrible. For a subtle shade it's actually a bit better this way as you can build it really easily to get exactly the coverage you want. I've seen it described once that it's best to think about Star Violet as the best supporting actor in your makeup movie not necessarily the main "star".


The eyeshadow itself feels really soft and smooth and glides on with out being patchy or having heap of fall out, it blends really nicely and has a wonderful shimmer to it.

All in all, it's amazing. i love it. It's my favorite eyeshadow that i own :)

What's your favorite/dream eyeshadow?

Saturday, 27 April 2013

Review Models Prefer Grand Finale Eye shadow Quad

 
I purchased this to qualify for the Priceline beauty bag (see post here) and I liked the colors but I wasn't expecting much from it, the only other Models Prefer pallet I have tried was about a year ago and it was terrible and I threw it away, so not high expectations but I was intrigued by the light blue/teal color so I figured why not give it a shot, the company has clearly taken steps in the last 6 months to improve.

 
This particular piece is called  "grand finale" no caps for some reason? And contains a set of four (hence quad I guess) eyeshadows; I'm not sure if they have individual names but the colors are a yellow/cream, a reddish copper, a light teal and a blurple. A unique and interesting selection but I have to say the colors really stood out to me, particularly the teal.

 
When I swatched these at home I was pretty damn surprised, each of these is one layer only and you can see that they are damn pigmented, they have a frosty finish but feel very creamy and almost thick to apply.  Having worn the blues and the copper since then I have found that they are indeed pigmented but do have a little fallout, but it seems to all be pigment with little to no filler as it's the farthest thing from chalky.  I'm really pleased with this quad and it makes me less afraid to try other Models Prefer products. Plus at $4.99 it's a total steal.